Thursday, November 30, 2006
Wednesday, November 29, 2006
Sunday, November 26, 2006
Saturday, November 25, 2006
Friday, November 24, 2006
Two of my favorite little snowflakes for earrings

Put 24 clear seed beads on size 20 or smaller thread.
1 shuttle & ball CTM - do not cut thread from ball
Ring ( 1 B 1 - 1 B 1 - 1 B 1 - 1 B 1 - 1 B 1 - 1 B 1 )
turn
Chain ( 5 [3B] 5 + ) repeat around
Tie end to beginning of the chain. Hide ends, Cut
use jump rings to attach to earring findings

Put 24 clear seed beads on size 20 or smaller thread.
1 shuttle & ball CTM - do not cut thread from ball
Ring ( 1 B 1 - 1 B 1 - 1 B 1 - 1 B 1 - 1 B 1 - 1 B 1 )
turn
Chain ( 5 [3B] 5 + ) repeat around
Tie end to beginning of the chain. Hide ends, Cut
use jump rings to attach to earring findings
Tuesday, November 21, 2006
Monday, November 20, 2006
Sunday, November 19, 2006
Saturday, November 18, 2006
Friday, November 17, 2006
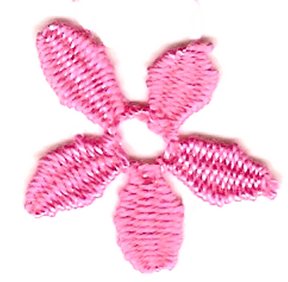
Think Spring!!! Hanging Cluny Cherry Blossom

This is SO easy to tat!!!
Begin a tatted chain with a picot, or a loop on a paper clip to make it like a SCMR.
HCl is a Hanging Cluny
LS is a Lock Stitch:
first half of DS flipped, then first half DS not flipped
Chain ( - 1 HCl LS HCl LS HCl LS HCl LS HCl LS )
Join to the picot at the beginning. Tie, Hide Ends, Cut
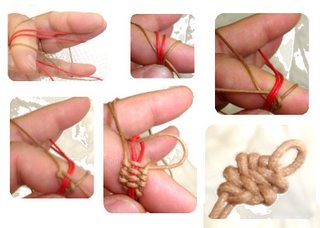
My method of a hanging Cluny:
Finger tatting or needle tatting. The core thread from the chain stitch is the weaver. The ball thread, although cut from the ball, is the loom. Hold the previous tatting in the pinch. The loom thread goes from the pinch around the middle, ring, and little fingers, and back down through the pinch.
Insert either a tatting needle the correct size for the thread you are using or a floss threader between the two threads in the pinch so that the eye is up and the point is down. Weave the core thread over both threads behind the needle, then around and under the far thread, over the needle, and then under the near thread. Continue weaving and shape as desired.

When the cluny is as long as you wish, these are 14 weaves long, insert the end of the weaver through the eye of the needle or floss threader and pull it down through the middle of the cluny carefully so it doesn't tangle. Leave just the smallest loop of this thread at the top. Next gently pull the loom thread down through until it is almost all the way through. Shape the top of the petal by tightening both threads slightly so that the end of the petal has the shape you want.
Both threads come out at the bottom. Tatting a lock stitch will ensure that the shape of the petal remains the same. Without the lock stitch, pulling on either thread would change the shape of the petal.
It can also be tatted using a piece of thread as a "magic thread" as shown here, but a tatting needle or floss threader is SO MUCH easier !!!
You can even leave a picot at the end if you wish. Then you can join to the end of the cluny as you continue tatting.

This is SO easy to tat!!!
Begin a tatted chain with a picot, or a loop on a paper clip to make it like a SCMR.
HCl is a Hanging Cluny
LS is a Lock Stitch:
first half of DS flipped, then first half DS not flipped
Chain ( - 1 HCl LS HCl LS HCl LS HCl LS HCl LS )
Join to the picot at the beginning. Tie, Hide Ends, Cut
My method of a hanging Cluny:
Finger tatting or needle tatting. The core thread from the chain stitch is the weaver. The ball thread, although cut from the ball, is the loom. Hold the previous tatting in the pinch. The loom thread goes from the pinch around the middle, ring, and little fingers, and back down through the pinch.
Insert either a tatting needle the correct size for the thread you are using or a floss threader between the two threads in the pinch so that the eye is up and the point is down. Weave the core thread over both threads behind the needle, then around and under the far thread, over the needle, and then under the near thread. Continue weaving and shape as desired.

When the cluny is as long as you wish, these are 14 weaves long, insert the end of the weaver through the eye of the needle or floss threader and pull it down through the middle of the cluny carefully so it doesn't tangle. Leave just the smallest loop of this thread at the top. Next gently pull the loom thread down through until it is almost all the way through. Shape the top of the petal by tightening both threads slightly so that the end of the petal has the shape you want.
Both threads come out at the bottom. Tatting a lock stitch will ensure that the shape of the petal remains the same. Without the lock stitch, pulling on either thread would change the shape of the petal.
It can also be tatted using a piece of thread as a "magic thread" as shown here, but a tatting needle or floss threader is SO MUCH easier !!!
You can even leave a picot at the end if you wish. Then you can join to the end of the cluny as you continue tatting.

Thursday, November 16, 2006
Split ring Christmas Ball Motif

All the tatting in this piece is 3 DS between picots. Two shuttles wound CTM. The center ring has 6 picots. The ends where the ring closes make 7 rings in the next row, each with 4 picots & the ends where the rings close make 5. The 3rd row is the same as the 2nd. The 4th row joins to 2 rings from the prev row and the rings have 6 picots, seven counting where the rings close. The outside row is rings & chains & join to two rings from the prev row. The rings are 4 picots & the chains have 3. This would make a pretty doily center and when the tatting is tight it lays nice and flat. Enjoy!

All the tatting in this piece is 3 DS between picots. Two shuttles wound CTM. The center ring has 6 picots. The ends where the ring closes make 7 rings in the next row, each with 4 picots & the ends where the rings close make 5. The 3rd row is the same as the 2nd. The 4th row joins to 2 rings from the prev row and the rings have 6 picots, seven counting where the rings close. The outside row is rings & chains & join to two rings from the prev row. The rings are 4 picots & the chains have 3. This would make a pretty doily center and when the tatting is tight it lays nice and flat. Enjoy!
Wednesday, November 15, 2006
Merry Christmas Tree 2006
I was playing with shapes for wings and came up with this cute little tree. It's similar to one that I used to tat from a Workbasket mag project, but different in several ways. I used to decorate tatted trees with beads, and give them away at Christmas time.
The four lower rings are all
5p separated by 3 DS, and
the top ring has 7 picots.
The chains are all 2 - 2 or 2 + 2.
Start at the bottom with a picot
at the beginning of a chain.
Chain (2) turn
Ring1 ( 3 - 3 - 3 - 3 - 3 - 3 ) turn
Chain ( 2 - 2 + ) Join to the first ring. turn
Ring2 ( 3 + 3 - 3 - 3 - 3 - ) Join to the 1st ring, turn
Chain ( 2 - 2 + ) Join to the second ring. turn
Ring3 ( 3 + 3 - 3 - 3 - 3 - 3 - 3 - 3 ) Join to 2nd ring, turn
Chain ( 2 + 2 ) Join to the previous chain picot, turn
Ring ( 3 + 3 + 3 - 3 - 3 - 3 ) Join to base of 3rd ring & to picot of 3rd ring, turn
Chain ( 2 + 2 ) Join to the previous chain picot, turn
Ring ( 3 + 3 + 3 - 3 - 3 - 3 ) Join to base of 4th ring & to picot of 4th ring, turn
Chain ( 2 ) Join to beginning picot and tie an overhand knot in the thread ends or tie hide cut.
Add beads as desired for decorations! Have FUN!!!
I was playing with shapes for wings and came up with this cute little tree. It's similar to one that I used to tat from a Workbasket mag project, but different in several ways. I used to decorate tatted trees with beads, and give them away at Christmas time.

The four lower rings are all
5p separated by 3 DS, and
the top ring has 7 picots.
The chains are all 2 - 2 or 2 + 2.
Start at the bottom with a picot
at the beginning of a chain.
Chain (2) turn
Ring1 ( 3 - 3 - 3 - 3 - 3 - 3 ) turn
Chain ( 2 - 2 + ) Join to the first ring. turn
Ring2 ( 3 + 3 - 3 - 3 - 3 - ) Join to the 1st ring, turn
Chain ( 2 - 2 + ) Join to the second ring. turn
Ring3 ( 3 + 3 - 3 - 3 - 3 - 3 - 3 - 3 ) Join to 2nd ring, turn
Chain ( 2 + 2 ) Join to the previous chain picot, turn
Ring ( 3 + 3 + 3 - 3 - 3 - 3 ) Join to base of 3rd ring & to picot of 3rd ring, turn
Chain ( 2 + 2 ) Join to the previous chain picot, turn
Ring ( 3 + 3 + 3 - 3 - 3 - 3 ) Join to base of 4th ring & to picot of 4th ring, turn
Chain ( 2 ) Join to beginning picot and tie an overhand knot in the thread ends or tie hide cut.
Add beads as desired for decorations! Have FUN!!!
Picot Tricks: Interlocked picots. The second row has to be reverse rings or might work with SCMR. The fourth picot has to be made with direct tatting so that it can be woven through the third picot and then around the first picot and back through the third picot. Then continue on tatting the ring.

Hugs!
Ruth

Hugs!
Ruth

Hooray!!! I found the cord for my scanner. Don't you know, it was in the very last box I opened to look for it.
Here are some scans of what I've been doing the past week or two after unpacking and sorting and putting things away as much as I could stand in any one day.
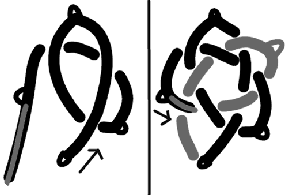
Five Point Celtic Christmas Star for Bina. This is the same Celtic knot as the rose I taught at Spokane 2006.
Begin a chain with a picot or a loop.
Chain (25 - 25 - 25 - 25 - 25 ) Weave Celtic Knot
Join the end to the beginning picot.
Continue tatting around the outside: Chain 12 - 12 + 12 - 12 + etc. Tie the end to the beginning and add twisted cord with the ends if desired or tie hide, cut.
Here is how to weave the Celtic Knot:
Saturday, November 11, 2006
What requires a shuttle and pink thread, has a snout, a curly tail, and lots of tatted babies?
Watch for the answer when I find the cord to my scanner, or my camera. I've promised the pattern for the babies to Georgia Seitz as a lesson for the online tatting class. Tatters everywhere enjoy sharing patterns, techniques, and fun online. Georgia puts tremendous effort into helping tatters share and learn together online. Thank you Georgia for all the great work you do coordinating lessons for the online tatting class. And thank you for all the fun I had visiting with you and Rich while traveling from Ohio to Kansas! ... and back ... and forth again.
I'm working on unpacking boxes since I have sent out all the books that people ordered. I've found a printer here in KC to print the books now, so I can concentrate on unpacking and get on with the next project:
"Celtic Tatting - Down on the Farm" should be ready in early 2007. This book will have the patterns for the chicken, turkey, and other farm animals. This topic was requested by my good friend Riet. Of course, Rita C. in Canada, will finally get the chicken pattern that I promised her more than a year ago.
( Trumpets sound fanfaire) Ta Da! We have a new grand child, Jenna Elizabeth Perry. Photos to follow. This precious addition to our family is truly a miracle child and a blessing. Praise the Lord !
That's all for now. Off to unpack boxes and look for my camera!
Hugs,
Ruth


