Think Spring!!! Hanging Cluny Cherry Blossom
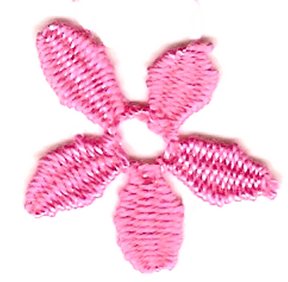
This is SO easy to tat!!!
Begin a tatted chain with a picot, or a loop on a paper clip to make it like a SCMR.
HCl is a Hanging Cluny
LS is a Lock Stitch:
first half of DS flipped, then first half DS not flipped
Chain ( - 1 HCl LS HCl LS HCl LS HCl LS HCl LS )
Join to the picot at the beginning. Tie, Hide Ends, Cut
My method of a hanging Cluny:
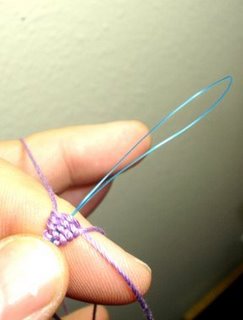
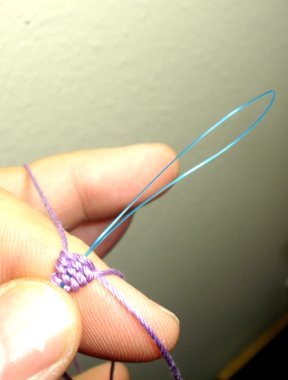
Finger tatting or needle tatting. The core thread from the chain stitch is the weaver. The ball thread, although cut from the ball, is the loom. Hold the previous tatting in the pinch. The loom thread goes from the pinch around the middle, ring, and little fingers, and back down through the pinch.
Insert either a tatting needle the correct size for the thread you are using or a floss threader between the two threads in the pinch so that the eye is up and the point is down. Weave the core thread over both threads behind the needle, then around and under the far thread, over the needle, and then under the near thread. Continue weaving and shape as desired.
When the cluny is as long as you wish, these are 14 weaves long, insert the end of the weaver through the eye of the needle or floss threader and pull it down through the middle of the cluny carefully so it doesn't tangle. Leave just the smallest loop of this thread at the top. Next gently pull the loom thread down through until it is almost all the way through. Shape the top of the petal by tightening both threads slightly so that the end of the petal has the shape you want.
Both threads come out at the bottom. Tatting a lock stitch will ensure that the shape of the petal remains the same. Without the lock stitch, pulling on either thread would change the shape of the petal.
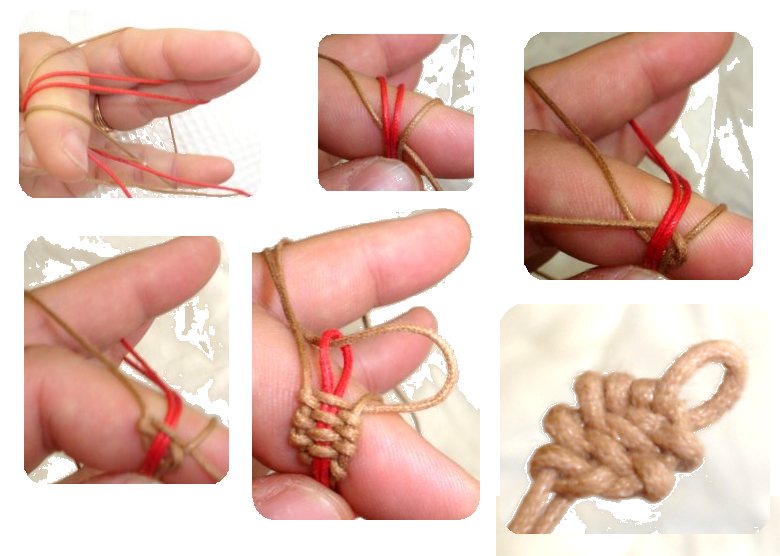
It can also be tatted using a piece of thread as a "magic thread" as shown here, but a tatting needle or floss threader is SO MUCH easier !!!
You can even leave a picot at the end if you wish. Then you can join to the end of the cluny as you continue tatting.

This is SO easy to tat!!!
Begin a tatted chain with a picot, or a loop on a paper clip to make it like a SCMR.
HCl is a Hanging Cluny
LS is a Lock Stitch:
first half of DS flipped, then first half DS not flipped
Chain ( - 1 HCl LS HCl LS HCl LS HCl LS HCl LS )
Join to the picot at the beginning. Tie, Hide Ends, Cut
My method of a hanging Cluny:
Finger tatting or needle tatting. The core thread from the chain stitch is the weaver. The ball thread, although cut from the ball, is the loom. Hold the previous tatting in the pinch. The loom thread goes from the pinch around the middle, ring, and little fingers, and back down through the pinch.
Insert either a tatting needle the correct size for the thread you are using or a floss threader between the two threads in the pinch so that the eye is up and the point is down. Weave the core thread over both threads behind the needle, then around and under the far thread, over the needle, and then under the near thread. Continue weaving and shape as desired.
When the cluny is as long as you wish, these are 14 weaves long, insert the end of the weaver through the eye of the needle or floss threader and pull it down through the middle of the cluny carefully so it doesn't tangle. Leave just the smallest loop of this thread at the top. Next gently pull the loom thread down through until it is almost all the way through. Shape the top of the petal by tightening both threads slightly so that the end of the petal has the shape you want.
Both threads come out at the bottom. Tatting a lock stitch will ensure that the shape of the petal remains the same. Without the lock stitch, pulling on either thread would change the shape of the petal.
It can also be tatted using a piece of thread as a "magic thread" as shown here, but a tatting needle or floss threader is SO MUCH easier !!!
You can even leave a picot at the end if you wish. Then you can join to the end of the cluny as you continue tatting.
posted by Ruth at 2:20 PM
![]()
![]()

<< Home